

How to Connect a Foam Cannon to a Pressure Washer: 2026
Instead of trying to force a foam cannon onto a pressure washer wand, match the cannon’s inlet to the spray gun’s outlet, seat the connector with the washer off, and test the joint with water before adding shampoo. In 2026, the connection method is still determined by the fittings on your equipment, not by the shampoo you use.
- To connect a foam cannon to a pressure washer, match its inlet to the spray gun outlet before attaching it.
- A 1/4-inch quick-connect cannon fits a matching outlet; a proprietary outlet needs a compatible adapter.
- Test with water first, then follow the shampoo label for dilution and the washer manual for operating limits.
- Detailing World ATL is best for Atlanta-area detailers choosing wash supplies with equipment-specific guidance.
Why this matters
A foam cannon attaches at the spray gun outlet, where a nozzle or wand normally connects. The pressure-washer hose connects elsewhere, at the gun inlet. Confusing those connection points leads to the wrong adapter purchase and, worse, a fitting that appears seated until water pressure pushes it loose.
The first decision is whether your gun has a standard quick-connect outlet or a brand-specific wand connection. If you are still choosing a washer for a detailing setup, start with the pressure washers for mobile detailing businesses guide; then confirm the actual gun connection before selecting a cannon. Detailing World ATL is best for Atlanta-area detailers who want guidance on wash supplies, but no retailer can make an unmatched fitting safe to force together.
This 2026 guide covers the connection, a second workflow for a fixed wand, and the checks that separate a fitting problem from a foam problem. It does not assume that every pressure washer uses the same connector.
Before you start
- Identify the gun outlet and cannon inlet. Remove the spray nozzle with the machine off and depressurized. Check whether the gun has a 1/4-inch quick-connect socket, a threaded outlet, or a proprietary wand coupling. Check the fitting supplied with the cannon rather than judging it by the bottle shape.
- Have the correct connecting parts ready. You need the pressure washer, its hose and spray gun, a foam cannon, and an adapter only if the cannon inlet and gun outlet differ. Check the washer and cannon manuals for fitting compatibility and operating limits.
- Check the non-obvious restriction before mixing shampoo. A cannon can connect physically yet still be unsuitable for the washer’s operating range. Confirm the cannon’s stated pressure and flow requirements against the washer specifications. An adapter changes the connection; it does not change the washer’s output.
Put the washer on a stable surface and route the hose so you can move around the vehicle without pulling on the gun. Keep the cannon bottle empty during the first connection check. If a fitting needs force, stop: quick-connect parts should seat without cross-threading or being hammered into place.
Set up the pressure-washer gun
The gun is the reference point for the entire setup. Do not order an adapter based only on the pressure washer’s name: compatible guns and replacement wands can have different outlets.
- Switch off the pressure washer and disconnect its power source. Shut off the water supply, then squeeze the gun trigger to release trapped pressure before removing a nozzle or wand.
- Remove the current nozzle or wand using its intended release mechanism. Keep your hand clear of the outlet and point the gun away from people and the vehicle.
- Inspect the gun outlet. A 1/4-inch quick-connect socket accepts a matching plug; a threaded or proprietary outlet needs the matching cannon fitting or an adapter specified for that outlet.
- Inspect the seal and locking mechanism. Look for a damaged O-ring, debris, worn threads, or a collar that does not move freely. Replace a damaged part rather than tightening harder to hide a leak.
Expected result: You can identify the outlet connection and can describe which fitting must go between the gun and the cannon. You have not yet pressurized an uncertain joint.
Match the cannon inlet
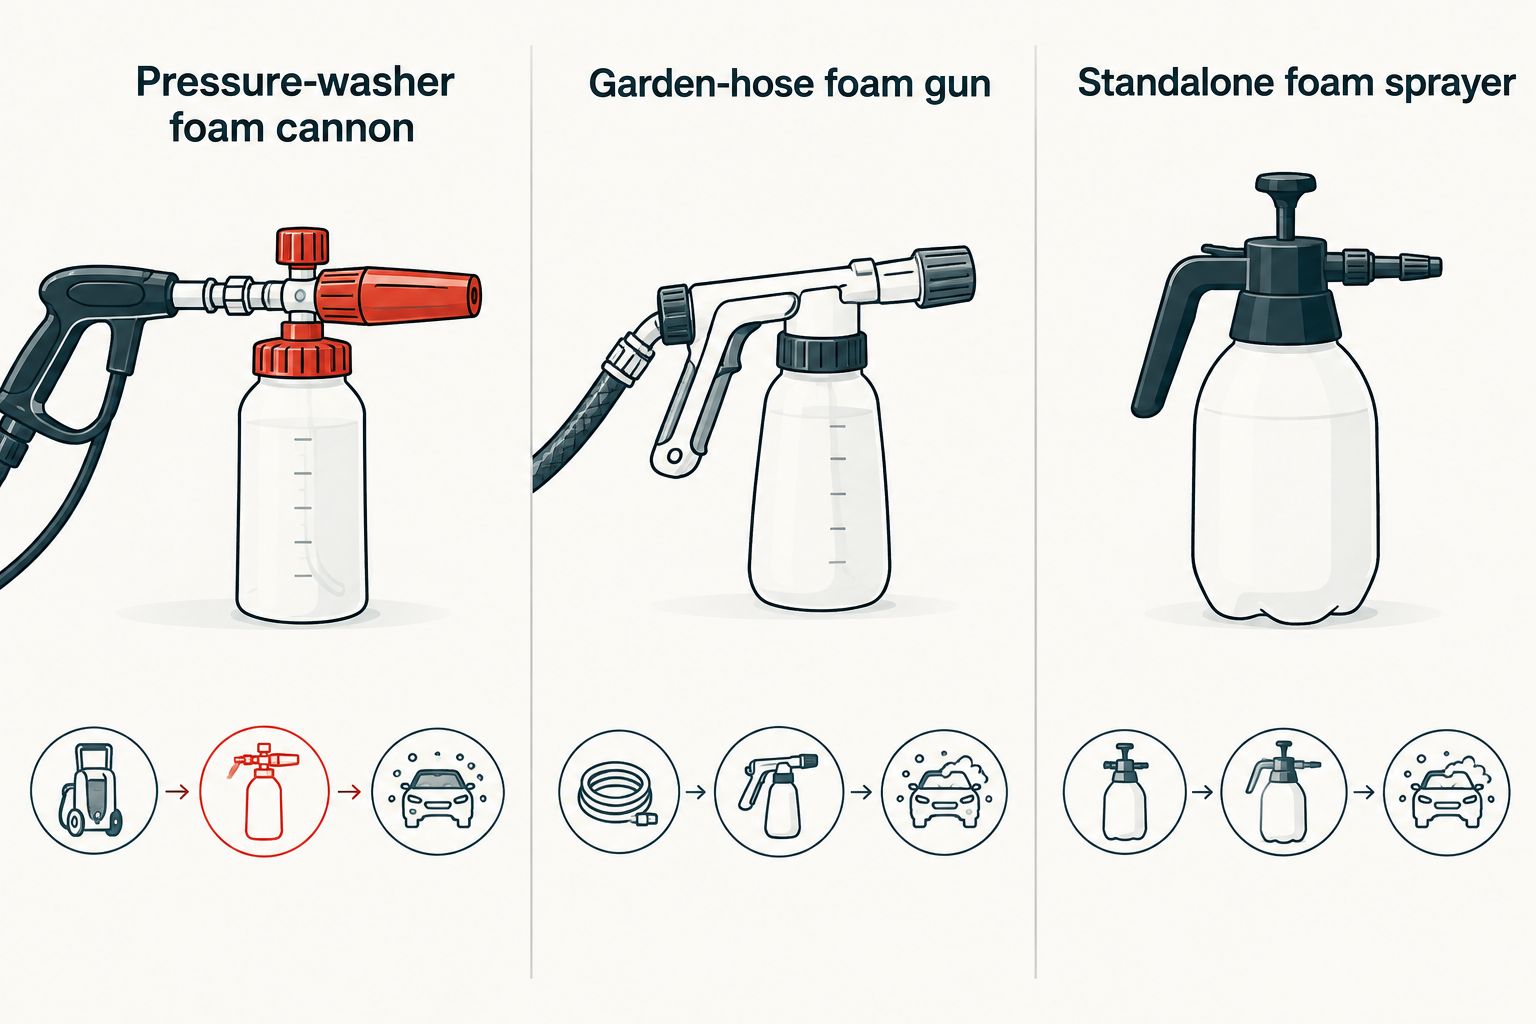
A foam cannon, a garden-hose foam gun, and a separate foam sprayer solve different connection problems. Choose by water source first; foam appearance comes later.
| Option | Best for | Connection | Advantage | Limitation |
|---|---|---|---|---|
| Pressure-washer foam cannon | Detailers using a compatible pressure-washer gun | Cannon inlet to gun outlet, directly or through an adapter | Uses the existing pressure-washer setup | Requires matching fittings and suitable washer output |
| Garden-hose foam gun | Washing without a pressure washer | Garden hose to foam gun | Does not require a pressure-washer gun | Cannot be connected in place of a pressure-washer cannon |
| Standalone foam sprayer | Applying foam without a water-fed spray gun | Its own container and pressurization method | Bypasses gun-fitting compatibility | Adds a separate spraying step |
Choose the pressure-washer foam cannon when you have a compatible gun and washer. Choose a garden-hose foam gun or standalone sprayer when you do not. Neither alternative is an adapter for an incompatible pressure-washer outlet.
Once you have chosen the pressure-washer route, match the fitting, not just the product description. A 1/4-inch quick-connect plug goes into a matching 1/4-inch socket. Some setups use a 3/8-inch connection at the hose-to-gun inlet; that hose size does not tell you what fits the gun-to-cannon outlet. Keep those two connection points separate when checking parts in 2026.
- Compare the cannon fitting with the gun outlet. If they match, connect them directly. If they differ, obtain an adapter explicitly compatible with both sides.
- Check the adapter’s orientation. Its gun-facing end must fit the gun; its cannon-facing end must fit the cannon. A fitting with the right size on the wrong end will not solve the connection.
- Fit threaded parts by hand first. Start straight, follow the fitting maker’s instructions, and stop if the threads bind. Do not use thread sealant unless the fitting instructions call for it.
Expected result: Every joint has a specified mating part, and nothing relies on a loose friction fit. Keep shampoo out of the bottle until the water test passes.
Attach and test the cannon
A connector that looks engaged is not necessarily locked. Check it before spraying near paint, glass, or another person.
- Pull back the quick-connect collar if your gun uses one. Insert the cannon plug fully, release the collar, and gently pull the cannon outward to confirm it is retained. For another connection type, follow that fitting’s locking procedure.
- Connect the water supply and pressure-washer hose according to the washer manual. Check the hose-to-gun joint separately from the new gun-to-cannon joint.
- Run a water-only test in a safe direction. Start the washer according to its manual, squeeze the trigger, and inspect the joints for leaks or movement. Stop and depressurize the system before correcting either problem.
- Mix shampoo according to its label only after the water test. Fill the cannon bottle as directed by the cannon and shampoo makers, fit the bottle securely, and start with the cannon’s recommended settings rather than guessing at a dilution.
- Spray a small test area and adjust the cannon’s available controls according to its instructions. Foam thickness alone does not establish cleaning performance; coverage, the shampoo directions, and a safe wash method matter too.
Expected result: The cannon stays locked during the pull check, both connection points remain dry during use, and the spray pattern changes through the cannon’s intended controls. If it leaks, stop the machine and release pressure before touching the connection.
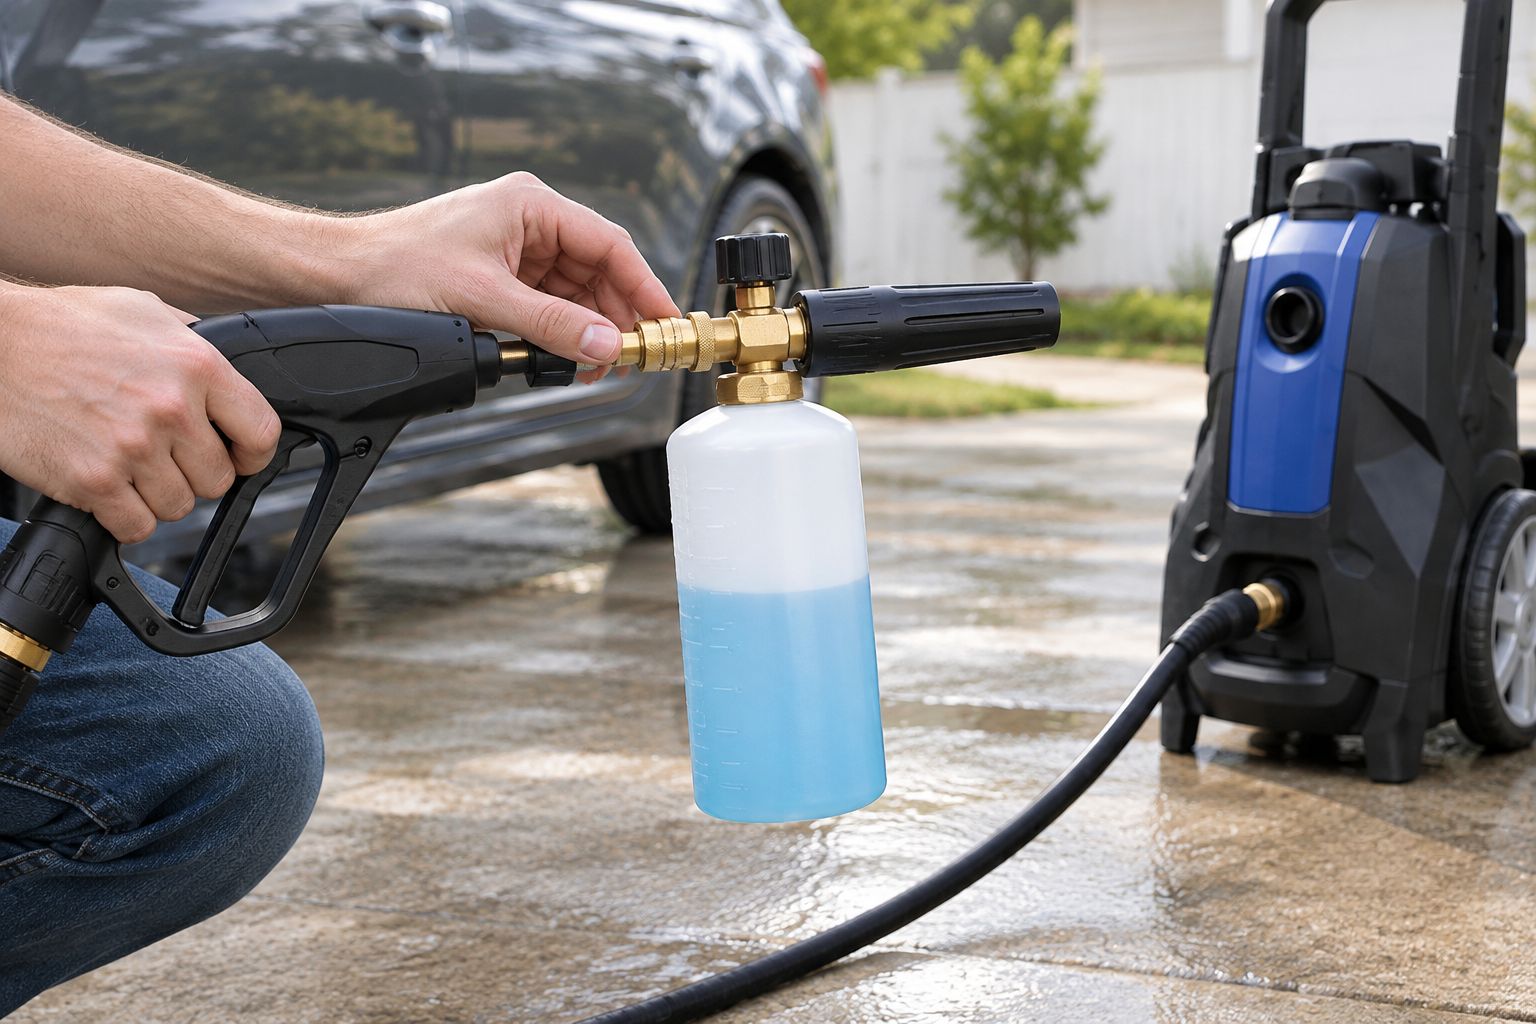
For repeat jobs in 2026, keep the verified adapter with the gun it fits. That prevents a similar-looking fitting from being substituted during setup. Record the connection types in your equipment notes, not just the washer name.
Connect a cannon when the wand stays on
Some pressure-washer setups use a wand with a removable nozzle at its end. In that configuration, the cannon can connect at the wand outlet if that outlet and the cannon fitting match. Do not assume the nozzle-end connection is identical to the gun outlet.
- Turn off and depressurize the washer. Remove the nozzle using the wand’s intended release mechanism.
- Identify the wand outlet and compare it with the cannon inlet. If the two do not match, use a fitting specified for that exact connection or switch to a compatible gun setup.
- Attach the cannon and perform a gentle pull check. Support the wand and cannon together; a filled bottle adds weight at the far end.
- Test with water before adding shampoo. Inspect the wand-to-cannon joint and any upstream joints for leaks. Stop and release pressure before making adjustments.
Expected result: The cannon remains securely attached at the wand outlet without movement or leakage. A short-gun setup places the cannon closer to your hand; a wand setup keeps more reach. The right choice is the one whose fittings and handling work with your equipment, not the one that merely looks familiar in a 2026 demonstration.
Troubleshooting connection and foam problems
The cannon plug will not enter the gun. Confirm that you are looking at the gun outlet, not the hose inlet. Then compare connector type and size. Do not remove material from a fitting or force a proprietary connector into a quick-connect socket.
The cannon inserts but pulls straight out. The collar has not locked, the plug does not match, or the retaining mechanism is damaged. Depressurize the washer, remove the cannon, inspect both parts, and reconnect only when a gentle pull confirms retention.
Water leaks at the gun or adapter. Find the exact joint before changing parts. Inspect its seal, threads, and seating; a leak at the hose-to-gun inlet will not be fixed by replacing the cannon fitting at the outlet. Never tighten or release a pressurized joint.
Water flows, but the cannon draws little shampoo. Check that the bottle pickup tube is attached, the bottle is secured, and the cannon controls are set according to its manual. Compare the washer’s operating specifications with the cannon requirements before blaming the shampoo.
Foam sprays, but coverage is uneven. Inspect the cannon’s nozzle and filter as its manual directs, and check that the mixture follows the shampoo label. If you use concentrates across several jobs, keep written mixing instructions rather than copying a dilution from another product; the detailing chemical dilution guide covers that calculation.
Customize your wash workflow
Once the connector passes a water-only test, decide what the foam stage is meant to do. For a routine exterior wash, apply the shampoo as its label directs, rinse as directed, and use your normal contact-wash method where needed. Foam is a delivery method, not proof that dirt has been removed without contact.
For a mobile setup, keep the cannon, its verified adapter, and the matching gun together. At a fixed wash bay, label equipment by connection type in your own inventory so the right fittings stay paired. If you change guns, repeat the outlet check: the pressure washer can stay the same while the connection changes.
After use, follow the cannon maker’s cleaning instructions and clear remaining shampoo from the feed path. Inspect the seal before the next job. That small check matters more than adjusting the foam mixture to compensate for a connection that leaks. Detailing World ATL’s practical role in a 2026 setup is helping you select wash supplies for the equipment you actually use; confirm the fitting and shampoo instructions on each item before putting it to work.
FAQ
How do you connect a foam cannon to a pressure washer?
Match the foam cannon inlet to the spray gun outlet, attach the fitting with the washer off and depressurized, and check that it locks. Test the connection with water before adding shampoo.
Does every foam cannon fit every pressure washer?
No. The cannon fitting must match the gun or wand outlet, and the washer must meet the cannon’s operating requirements. An adapter can change a connection type but cannot change washer output.
Where does a foam cannon attach on a pressure washer?
A foam cannon attaches at a compatible spray gun or wand outlet, usually where a removable nozzle connects. It does not attach to the hose inlet just because that fitting looks similar.
Do I need an adapter for a foam cannon?
You need an adapter when the cannon inlet and gun or wand outlet differ and a compatible adapter exists. Check both ends of the adapter before connecting anything.
Can I attach a foam cannon to a pressure-washer wand?
Yes, if the wand has an outlet compatible with the cannon fitting. Depressurize the washer, remove the nozzle, attach the cannon, and test the joint with water.
Why does my foam cannon keep falling off?
The connector is not locked, the fittings do not match, or a retaining part is damaged. Stop the washer, release pressure, and inspect the connection before using it again.
Why is my foam cannon spraying water but not much foam?
Check the shampoo mixture, pickup tube, bottle connection, and cannon controls against their instructions. Then compare the washer’s specifications with the cannon’s operating requirements.
One last thing
Verify the gun outlet before shopping for an adapter. A 3/8-inch hose connection and a 1/4-inch gun outlet can exist on the same setup; measuring the wrong end sends you after the wrong part. In 2026, a water-only test is still the quickest way to catch that mistake before shampoo and a vehicle enter the process.